思科模拟器是网络学习和实验中不可或缺的工具,它允许用户在没有实际硬件设备的情况下,通过命令行界面(CLI)模拟配置和管理思科网络设备,如路由器、交换机等,这种模拟环境不仅降低了学习成本,还提供了安全、灵活的实践平台,尤其适合网络初学者和专业人士进行技能测试与方案验证。

在思科模拟器中,命令行是核心操作方式,用户需要输入特定的指令来完成设备配置、监控网络状态及故障排查,以下是命令行操作的详细说明,涵盖常用命令、配置步骤及实用技巧。
命令行基础操作
-
设备启动与初始访问
启动模拟器后,设备通常处于初始状态,通过Console口或Telnet/SSH方式登录设备,首次登录无需密码(默认配置),进入CLI后,用户会看到提示符,如Router>(用户模式)或Switch>(交换机用户模式),输入enable命令进入特权模式,提示符变为Router#或Switch#,此时可执行更多高级命令。 -
模式切换
思科设备的CLI采用分层模式结构,不同模式支持不同命令集:- 用户模式(EXEC模式):基本查看命令,如
ping、telnet。 - 特权模式:查看配置、重启设备、进入全局配置模式。
- 全局配置模式:修改设备全局参数,通过
configure terminal(简写conf t)进入,提示符为Router(config)#。 - 子配置模式:如接口配置模式(
interface GigabitEthernet0/0)、线路配置模式(line console 0)等,提示符会进一步细化,如Router(config-if)#。
示例模式切换流程:
 (图片来源网络,侵删)
Router> enable Router# configure terminal Router(config)# interface GigabitEthernet0/0 Router(config-if)# - 用户模式(EXEC模式):基本查看命令,如
常用配置命令
-
设备基本信息配置
在全局配置模式下,可设置设备名称、密码等:Router(config)# hostname R1 R1(config)# enable secret cisco123 // 设置特权模式密码 R1(config)# line console 0 R1(config-line)# password consolepass R1(config-line)# login -
接口配置
接口是设备连接网络的媒介,需配置IP地址、状态等:R1(config)# interface GigabitEthernet0/0 R1(config-if)# ip address 192.168.1.1 255.255.255.0 R1(config-if)# no shutdown // 启用接口 R1(config-if)# description LAN_to_PC -
路由协议配置
静态路由和动态路由(如OSPF、EIGRP)是网络通信的核心:- 静态路由:
ip route <目标网络> <子网掩码> <下一跳IP>R1(config)# ip route 10.0.0.0 255.255.255.0 192.168.1.2 - OSPF配置:
R1(config)# router ospf 1
R1(config-router)# network 192.168.1.0 0.0.0.255 area 0
- 静态路由:
-
VLAN配置(交换机)
交换机通过VLAN划分广播域: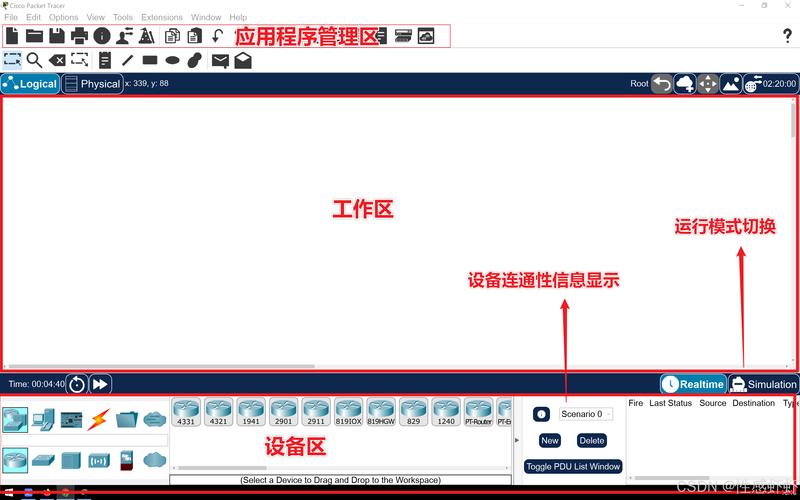 (图片来源网络,侵删)
Switch(config)# vlan 10
Switch(config-vlan)# name Sales
Switch(config)# interface FastEthernet0/1
Switch(config-if)# switchport mode access
Switch(config-if)# switchport access vlan 10
监控与故障排查命令
配置完成后,需通过命令验证网络状态:
- 查看配置:
show running-config(当前运行配置)、show startup-config(启动配置)。 - 查看接口状态:
show ip interface brief(显示接口IP和状态)。 - 测试连通性:
ping <目标IP>、traceroute <目标IP>(简写tracert)。 - 查看路由表:
show ip route。 - 查看日志:
show logging。
示例:
R1# show ip interface brief
Interface          IP-Address      OK? Method Status                Protocol
GigabitEthernet0/0 192.168.1.1     YES manual up                    up
GigabitEthernet0/1 unassigned      YES unset  administratively down down
高级命令与技巧
-
配置保存与擦除
- 保存当前配置:
copy running-config startup-config(简写wr)。 - 恢复默认配置:
erase startup-config后重启设备。
- 保存当前配置:
-
ACL(访问控制列表)配置
用于控制流量访问:R1(config)# access-list 1 permit 192.168.1.0 0.0.0.255 R1(config)# interface GigabitEthernet0/0 R1(config-if)# ip access-group 1 in -
NAT(网络地址转换)配置
实现内网访问外网:R1(config)# ip nat inside R1(config)# interface GigabitEthernet0/0 R1(config-if)# ip nat inside R1(config)# interface GigabitEthernet0/1 R1(config-if)# ip nat outside R1(config)# ip nat inside source list 1 interface GigabitEthernet0/1 overload
模拟器实用建议
- 拓扑规划:实验前先设计网络拓扑,明确设备角色和连接关系。
- 分步配置:先实现基础连通性(如直连路由),再逐步添加复杂功能(如动态路由、ACL)。
- 善用帮助:命令输入可查看当前模式支持的命令,如
show ?。 - 备份配置:定期保存配置,避免误操作导致配置丢失。
相关问答FAQs
Q1: 在思科模拟器中如何配置Telnet远程登录?
A1: 配置Telnet需在全局配置模式下设置线路密码并启用登录功能,步骤如下:
- 进入线路配置模式:
line vty 0 4(支持5个并发会话)。 - 设置密码:
password telnetpass。 - 启用登录:
login。 - 配置VTY线路使用密码验证:
login local(若使用本地用户数据库)。
示例:R1(config)# line vty 0 4 R1(config-line)# password telnetpass R1(config-line)# login完成后,从其他设备可通过
telnet <设备IP>远程登录。
Q2: 如何在模拟器中模拟链路故障进行测试?
A2: 可通过关闭接口模拟链路中断:
- 进入接口配置模式:
interface GigabitEthernet0/0。 - 关闭接口:
shutdown,此时接口状态变为administratively down,网络通信中断。 - 恢复接口:
no shutdown。
还可通过模拟器软件的“链接状态”功能手动断开设备间的连线,观察路由协议的收敛过程(如OSPF的邻接关系变化)。

