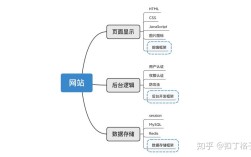
要制作一个简单的网页,无需复杂的编程知识,只需掌握基础的前端技术(HTML、CSS和少量JavaScript)即可,以下是详细的步骤和说明,帮助你从零开始构建自己的网页。

(图片来源网络,侵删)
准备工作:工具与环境
在开始之前,需要准备以下工具:
- 文本编辑器:推荐使用免费的编辑器,如Visual Studio Code(支持代码高亮和插件)、Sublime Text或Notepad++,这些工具能帮助你编写和调试代码。
- 浏览器:用于预览网页效果,推荐使用Chrome或Firefox,它们都有开发者工具(按F12打开),方便调试。
- 基础文件结构:创建一个文件夹(如
my-website),在其中新建三个文件:index.html(网页结构)、style.css(样式表)和script.js(脚本文件,可选)。
编写HTML:网页的骨架
HTML(超文本标记语言)是网页的基础结构,用于定义内容(如文本、图片、链接等),以下是一个简单的index.html示例:
<!DOCTYPE html>
<html lang="zh-CN">
<head>
<meta charset="UTF-8">
<meta name="viewport" content="width=device-width, initial-scale=1.0">我的第一个网页</title>
<link rel="stylesheet" href="style.css">
</head>
<body>
<header>
<h1>欢迎来到我的网站</h1>
<nav>
<ul>
<li><a href="#home">首页</a></li>
<li><a href="#about">关于我</a></li>
<li><a href="#contact">联系方式</a></li>
</ul>
</nav>
</header>
<main>
<section id="home">
<h2>首页内容</h2>
<p>这是一个简单的网页示例,用于展示HTML和CSS的基本用法。</p>
<img src="https://via.placeholder.com/300x200" alt="示例图片">
</section>
<section id="about">
<h2>关于我</h2>
<p>我是一名网页设计爱好者,喜欢通过代码创造有趣的内容。</p>
</section>
<section id="contact">
<h2>联系方式</h2>
<p>邮箱:example@email.com</p>
</section>
</main>
<footer>
<p>© 2023 我的网站. 保留所有权利.</p>
</footer>
<script src="script.js"></script>
</body>
</html>
代码说明:
<!DOCTYPE html>:声明文档类型,确保浏览器正确渲染页面。<head>:包含元数据(如字符编码、视口设置)和资源引用(如CSS文件)。<body>:网页的可见内容,包括标题、导航、正文和页脚。<section>和<header>等标签:语义化标签,帮助浏览器理解内容结构。<link>和<script>:分别用于引入CSS和JavaScript文件。
添加CSS:美化网页
CSS(层叠样式表)用于控制网页的视觉表现,如颜色、字体、布局等,以下是style.css的示例:
/* 全局样式 */
* {
    margin: 0;
    padding: 0;
    box-sizing: border-box;
}
body {
    font-family: Arial, sans-serif;
    line-height: 1.6;
    color: #333;
    background-color: #f4f4f4;
}
/* 头部样式 */
header {
    background-color: #333;
    color: #fff;
    padding: 1rem;
    text-align: center;
}
header h1 {
    margin-bottom: 1rem;
}
nav ul {
    list-style: none;
    display: flex;
    justify-content: center;
    gap: 2rem;
}
nav a {
    color: #fff;
    text-decoration: none;
    font-weight: bold;
}
nav a:hover {
    text-decoration: underline;
}
样式 */
main {
    max-width: 800px;
    margin: 2rem auto;
    padding: 1rem;
    background-color: #fff;
    border-radius: 5px;
    box-shadow: 0 0 10px rgba(0, 0, 0, 0.1);
}
section {
    margin-bottom: 2rem;
}
section h2 {
    color: #333;
    border-bottom: 2px solid #333;
    padding-bottom: 0.5rem;
}
img {
    max-width: 100%;
    height: auto;
    border-radius: 5px;
    margin: 1rem 0;
}
/* 页脚样式 */
footer {
    text-align: center;
    padding: 1rem;
    background-color: #333;
    color: #fff;
    margin-top: 2rem;
}
样式技巧:
- 盒模型:
box-sizing: border-box确保元素的宽高包含内边距和边框。 - 响应式设计:通过
max-width和margin: auto实现居中布局,适应不同屏幕尺寸。 - 颜色与字体:选择易读的字体和对比度高的颜色组合。
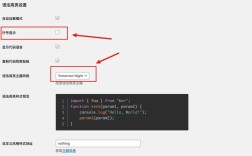
添加JavaScript:交互功能(可选)
如果需要动态效果(如点击按钮显示隐藏内容),可以添加简单的JavaScript,以下是script.js的示例:

(图片来源网络,侵删)
document.addEventListener('DOMContentLoaded', function() {
    const contactSection = document.getElementById('contact');
    const button = document.createElement('button');
    button.textContent = '点击显示更多信息';
    button.style.marginTop = '1rem';
    button.style.padding = '0.5rem 1rem';
    button.style.backgroundColor = '#333';
    button.style.color = '#fff';
    button.style.border = 'none';
    button.style.borderRadius = '5px';
    button.style.cursor = 'pointer';
    button.addEventListener('click', function() {
        const moreInfo = document.createElement('p');
        moreInfo.textContent = '这是一个通过JavaScript动态添加的内容!';
        contactSection.appendChild(moreInfo);
        button.style.display = 'none';
    });
    contactSection.appendChild(button);
});
功能说明:
DOMContentLoaded:确保DOM加载完成后执行脚本。- 动态创建按钮和段落,并绑定点击事件。
预览与发布
- 本地预览:用浏览器打开
index.html文件,查看效果。 - 调试:使用浏览器开发者工具(F12)检查代码错误或调整样式。
- 发布:若需在线访问,可将文件上传至免费托管平台(如GitHub Pages、Netlify或Vercel)。
进阶建议
- 学习资源:通过MDN Web Docs、W3Schools或freeCodeCamp系统学习HTML/CSS。
- 框架工具:若需更复杂功能,可尝试Bootstrap(CSS框架)或React(JavaScript库)。
- 优化:压缩图片、合并CSS/JS文件,提升加载速度。
相关问答FAQs
问题1:如何让网页在手机上也能正常显示?
解答:通过响应式设计实现,在CSS中使用媒体查询(@media)针对不同屏幕尺寸调整布局。
@media (max-width: 600px) {
    nav ul {
        flex-direction: column;
        gap: 1rem;
    }
    main {
        margin: 1rem;
    }
}
在HTML的<head>中添加<meta name="viewport" content="width=device-width, initial-scale=1.0">>,确保移动设备正确缩放。
问题2:如何为网页添加背景图片?
解答:在CSS的body样式中使用background-image属性。
body {
    background-image: url('background.jpg');
    background-size: cover; /* 图片覆盖整个背景 */
    background-position: center; /* 图片居中 */
    background-attachment: fixed; /* 滚动时背景固定 */
}
注意:图片路径需正确,且建议使用压缩后的图片以加快加载速度。

(图片来源网络,侵删)